In this article I will develop a Film Look PowerGrade for Resolve, which you can download and freely use on your own projects.
This is the last of four articles. In the first I conducted a practical test of Lumix S5 footage and stabilisation. The second article walked through an ACES workflow for DaVinci Resolve. The third article explained the film look and how to set up your Lumix S camera to shoot optimal footage.
Check out the video below, which compares the plain grading in my original installment with the new Film Look. Then read on for details.
Managing multiple clips
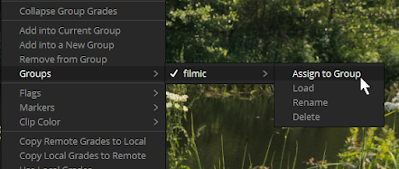
Before we get to the grade, I need to mention this fantastic way to manage clips in Resolve. While in the Color Workspace, right-click one or more video clips. You can assign these to a new or existing colour group, as shown below.
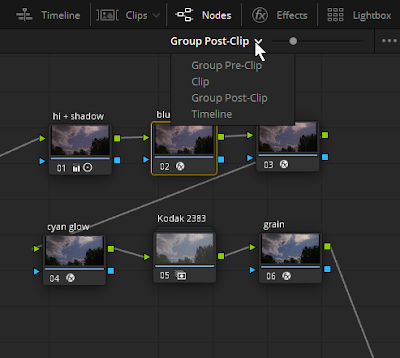
How does this help? Check out the tiny almost-hidden pulldown menu in the node tree panel. Each of these four options reveals a different part of the workflow. We can add nodes to the entire group Pre-Clip, or add nodes to this specific clip only, or add nodes to the entire group Post-Clip. The flow proceeds from one workspace to the next. We can also add nodes to the entire Timeline. This gives us an enormous amount of control! The power! The power!
Ahem.
As you can see, I use the PowerGrade in the Group Post-Clip panel. This way I can "set and forget" this look, before going back to correcting exposure on individual clips as needed.
Node by node explanation
This workflow assumes that you are using the ACES project settings as previously described. This frees us from needing to transform footage, which is why we don't have CSTs in this chain. (Actually there are hidden CSTs, as we shall see, to enable access to a special effect.)
There are six nodes in a serial chain pictured above. This is a fairly minimal node tree, which you can extend as required. For example, if you need noise reduction, add this to the beginning of the chain.
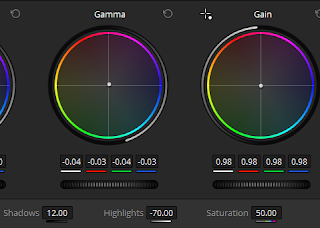
Node 1 is where we can pull back the highlights and the shadows, adjust our overall gamma, and otherwise change exposure. Though we are working in a Cineon-like gamma, a few adjustments can help this look more like the film we desire.
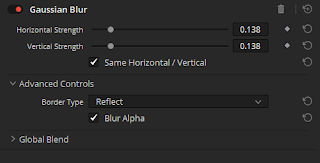
The second node uses the built-in Gaussian Blur effect to remove that digital sharpness. Here the strength is set to around 0.14 but judge this amount by eye. It will depend on the resolution and other characteristics of your footage.
Halation is a glow around high-luminance, high-contrast areas of the image, for example trees against a bright sky. With this effect, the light seems to leak out of its normal boundaries. With film stock this is associated with a red tint. Though halation is technically a defect of the photochemical process, it has become associated with the look of film.
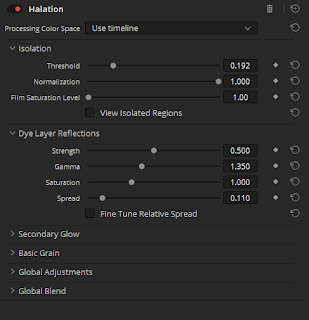
Here I use the built-in Halation effect with threshold at 0.19. There are many other properties to experiment with here. Or you might not want this effect at all.
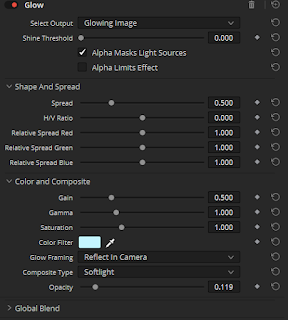
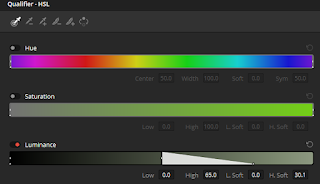
The fourth node uses the Glow effect. This has the Shine Threshold set to zero and the Composite type changed to "softlight". In the Qualifier panel both Hue and Saturation are turned off. The luminance channel has been modified to not effect bright areas (The High boundary is set to 65 and H.Soft to 30).
The sixth node uses the Film Grain effect with several parameters changed to get a subtle effect. In fact, I used stronger settings than these in the demo video.
Applying the LUT
Now we can address the fifth node. This is actually a composite of three nodes required to apply the look of Kodak 2383 print film. This famed chemical recipe produces neutral highlights, saturated colours, and rich blacks that many associate with projected film. You can read about it on Kodak's own page.
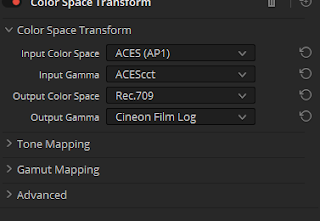
Resolve comes with a built-in LUT for Kodak 2383 (in fact three, for different white points). But in order for this to work properly, we must be in the correct colour space. First we use the Color Space Transform (CST) effect to map from ACES gamut and ACEScct gamma (as defined in our project settings) to Rec.709 gamut and Cineone Film Log gamma.
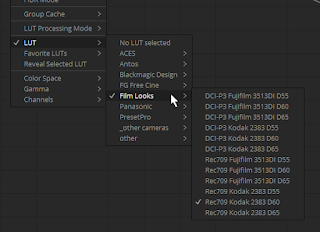
Now we can apply the Resolve Film Look LUT that we prefer. You can either choose this from the context menu of a node (as pictured above) or drag it from the LUT panel to that node.
The third node provides a CST back to the ACES/ ACEScct space.
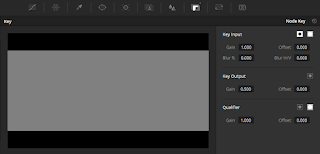
Because I find the LUT a bit strong in its default implementation, I use the Key panel to dial this down to half. This interface is one of the middle panels. I've ignored everything here except the Key Output, which is set to 0.5.
That's the grade finished!
Stills and PowerGrades
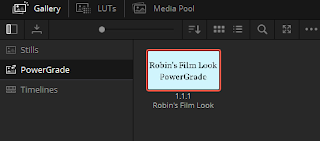
Resolve uses some peculiar terminology when referring to grades. To proceed, open the Gallery panel and also toggle open Still Albums using the little window icon. It should look like the following.
To save all the nodes used on a given clip, right-click on the viewer and choose "Grab Still". Of course this is not a still at all, since the grade applies to motion video. It's simply a snapshot of your grade. By default this is placed in the Stills album, but you can move this to the PowerGrade album. This allows you to use this particular Still between projects. Again, there's nothing powerful about a PowerGrade, it's just a daft name for a preset.
To share this PowerGrade with you, I right-clicked on the thumbnail and chose "Export". Resolve created two files in the target folder, with extensions .DRX and .DPX. Both files are required.
You can now download this PowerGrade as a ZIP archive. Unzip this somewhere convenient. To use the grade on your project, simply drag the .DRX file into the Gallery. Then you can apply it to footage as you wish.
In conclusion
When first starting out with colour grading, it's convenient to simply apply a LUT and say you've created your own look. But there's a lot more to emulating film than that simple process. A PowerGrade allows much greater control over your pipeline, with every parameter ready for you to change as required.
The process I've presented here is based on best practices of colourists such as Jake Pierrelee and Juan Melara, both of whom share tutorials online. I have simplified what is usually a much more involved process, since for me this is a good starting point.


No comments:
Post a Comment