This article explains how to set up an industry-standard ACES workflow. This removes the requirement for using colour space transforms (CSTs) and look-up tables (LUTs), though you still can use such nodes if you need to. ACES ensures consistent colour processing from beginning to end. And it's simple.
Read on and I will provide instructions for DaVinci Resolve while explaining some technical background.
The ACES model
The advent of digital recording gifted us a huge variety of cameras, displays, and other equipment. The Academy of Motion Picture Arts and Sciences (those folk who give out the Oscars) began a project to standardise this confusing mess... way back in 2004. Today the Academy Color Encoding System (ACES) provides an easy post-production workflow.
ACES uses an RGB color model with a huge colour space and over 30 stops of exposure. This model can represent visual perception in its entirety. This image data is "scene-referred", which means that the data refers to the lighting and colours as they actually existed in front of the camera. To do this, an idealised "standard camera" is referenced. When you bring footage into an ACES workflow, the profile of the camera you used is mapped onto this reference. This mapping can happen automatically if the camera footage is tagged appropriately.
Since it has evolved over time, ACES offers several similar colour spaces. ACEScc applies a Cineon-style log encoding, which helps colour wheels and other controls respond to footage in a "film-like" way. Apparently, this makes experienced operators more comfortable... but I wouldn't know, having never edited film.
ACEScct goes further by adding a roll-off at the toe of the image to improve shadows. This colour space is larger than the ITU Rec.2020 colour space, so we lose nothing by choosing this option.
Setting up ACES in Resolve
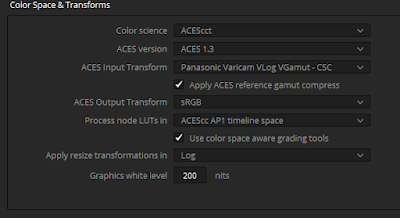
The setup is easy once you know how, though I had to read several chapters in the enormous Resolve manual to figure this out. But that's why you are reading this article... to benefit from my investment and save your own time!When starting a new project, go to the "Project Settings" and click the "Color Management" tab. Set up your "Color Space & Transforms" as follows.
We use the ACEScct colour science and the latest version 1.3. The Input Transform should be chosen to match the footage you most often expect. For a Panasonic Lumix camera, set this to "Panasonic Varicam VLog VGamut". For a Blackmagic camera, choose "Blackmagic Design Film Gen 5", assuming you shot with the "Film" profile in camera.
Since I am producing output for screen, I choose "sRGB" for the output transform. If instead you are producing output for standard broadcast, choose "Rec.709". For digital cinema choose a version of P3 as specified by your distributor.
Now we can specify the space we'll be using as an intermediate between input and output, which is to say the space in which our processing takes place. Confusingly, there is no "ACEScct" so instead choose "ACEScc". (The terminology is not always consistent in different places in Resolve. This should be fixed.)
If you like, save these settings as your default so you never need to think about ACES again.
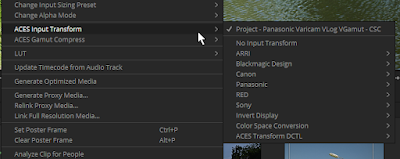
There is one sanity check you should make when ingesting footage. In the Media workspace right-click on a clip and confirm the "ACES Input Transform". This should be automatically identified as Panasonic Varicam (or whatever you set). But if not, you can change the transform manually.
This is also useful when your B-cam is different from your default. Select all the media from the B-cam, right-click, and change the transform.
Grading
When it comes to colour grading, there is no need for CSTs or LUTs. The ACES workflow automatically transforms your clip from the input space to our intermediary work space, and then to the output space for delivery. Simple!
If you do want to apply a LUT for aesthetic reasons, be sure to note what colour space that LUT expects, since all tables are locked to one space. For example, the LUTs supplied with DaVinci are made for Rec.709. You need three serial nodes: a CST to transform from ACES to Rec.709, your LUT, a CST to transform back from Rec.709 to ACES.
About gamut and gamma
It's important to realise that for every transform, there are actually two characteristics that are being mapped. The first is gamut, the range of colour available in the colour space. The second is the gamma, which specifies a luminance (brightness) curve.
The broadcast standard Rec. 709 has a gamma of 2.4, which specifies a logarithmic curve that allows for greater resolution in the most important range. To accommodate this, the midpoint of the luminance curve is shifted to 18% gray. But computers with sRGB colour space have a gamma of 2.2, which was design for the brighter viewing conditions of an office space.
Output designed for one gamma will not look the same on a device set to a different gamma.
Alternative workflows
ACES is not the only workflow, merely the best. Blackmagic offer their own methods.
The first of these was "DaVinci YRGB" which is "Display Referred". This means that accuracy can only be judged using a calibrated display; Resolve has no absolute knowledge of the colour. This mode requires that you manage all transforms from one colour space to another manually.
The second system is "DaVinci YRGB Color Managed" which, like ACES, is "Scene Referred" and requires matching ingested media to a known colour profile, after which Resolve manages the workflow. I've had difficulties ensuring consistency using this method. While this is likely due to user error, the ACES method presented no such impediments.
Finally
Almost everything on the internet about workflow and LUTs is wrong. In part that's because the creator of the video you are watching wants to sell you his LUTs instead of encouraging you to learn correct colour grading. Find your own styles, make your own LUTs, be a creative individual!
Thanks to CharlesH on the L-mount Forum for encouraging me in this direction.


No comments:
Post a Comment