The Windows operating system supports an extraordinarily diverse range of hardware and software. For common, everyday tasks, it works well. But it's not optimised for media production out of the box. What happens when you get stuttering playback, crackling audio, and other nasty symptoms? Nine times out of ten these problems can be fixed by changing the default settings
This extensive series of articles provides an easy, step-by-step approach to eliminating the major causes of audio glitches. The knowledge compiled here comes from decades of practical experience. Nothing here requires registry tweaks or third-party software, but can easily be achieved through the Windows interface, confusing though that may sometimes be.
Introduction
Start by recognising that not all hardware is made equal. Many people attempt audio production on laptops that have been made with whatever components were cheapest for the manufacturer to purchase that week. Add to this an audio interface that costs the same as a pair of trainers. Is it any wonder that problems ensue?
Most so-called "professional" audio products are actually targeted to the mass market. These might be built with cheap chipsets in order to lower prices. The firmware and software stacks are obtained as off-the-shelf libraries from third-party developers. Now, this is not necessarily a fatal flaw. You might buy an audio interface from Behringer, Focusrite, Presonus, etc. that works out well.
Or it might not. The problem then is that it's difficult to determine if it's the audio card, your computer, or your software that is at fault. If you begin with a better audio card, you eliminate one of the three potential sources of your problems.
Surprisingly, there is only one audio company that has written all their own drivers from the ground up. Not coincidentally, this firm has no-nonsense support, taking care of their customers as though the calendar still says 1979. Products that haven't been sold in ten years still get driver updates and new features. And the sound quality is exemplary.
That company is RME. Of course this German engineering doesn't come cheap, but neither is it the most expensive option on the market. (A bigger problem is the worldwide component shortage that makes even finding a unit difficult.)
With that recommendation out of the way, I can continue with this extensive software guide... useful even if you are not blessed with RME.
Eight Tuning Steps
The following are essential steps to tune your system. None require specialist software, registry tweaks, or hacks. Please do all of these before asking anyone else for help. Chances are, your problem will be solved.
Step 1. Check your computer spec
Perhaps your computer is very old or very tired? If you don't have enough disk space or memory (RAM), your applications will struggle. Be sure you have adequate free space on your boot drive. Confirm that your meet the optimum (not just minimum) requirements of the software you are using.
If you have on older computer that's still using hard drives, upgrade your boot drive to an SSD. Do this now!
Step 2. Update your software
- motherboard BIOS
- operating system, namely Windows 10 or 11
- device drivers (especially audio and video drivers)
- DAW or other host software
If you have an Nvidia graphics card, be sure to install their Studio driver, not the default gaming driver. This won't hurt your gaming experience. It just pulls you back from the bleeding edge.
If it's been a long time since your last operating system install, it's recommended to wipe your system and re-install Windows. A good deal of cruft accumulates over time.
This article contains details on device drivers.
Step 3. Remove unused Windows components following my handy guide.
Step 5. Tune Windows power plans to ensure your USB and PCI Express buses won't sleep and cause latency. Read all about it.
Step 7. Tune your soundcard with this article.
Step 8. Optimise your USB connection.
a) Don't use USB hubs or splitters.
b) Not all USB cables are created equal. And no, this has nothing to do with magic pixel dust audio cables. Use only the USB cable that came with your sound card. Or buy a high-quality replacement.
c) Remove all non-essential devices connected to USB. Not all USB chipsets support full bandwidth. There seems to be no way to control the bandwidth allocation, so one bad device could steal it all.
d) Try connecting your audio interface to different USB ports. The USB 3 (blue connector) ports provide for greater bandwidth, but this doesn't imply stability. Your USB 2 ports might be controlled by a chipset that behaves better.
If you have a desktop computer you can buy an add-in USB card that ensures isolation from other ports. This is advisable if you have several high-throughput devices. Keep each on a different bus, managed by a different controller chip.
OMG I Still Have Problems
Chances are that the comprehensive steps have solved your audio glitches. But if they remain, don't despair. If nothing else, you now have a test bed on which to diagnose any remaining issues.
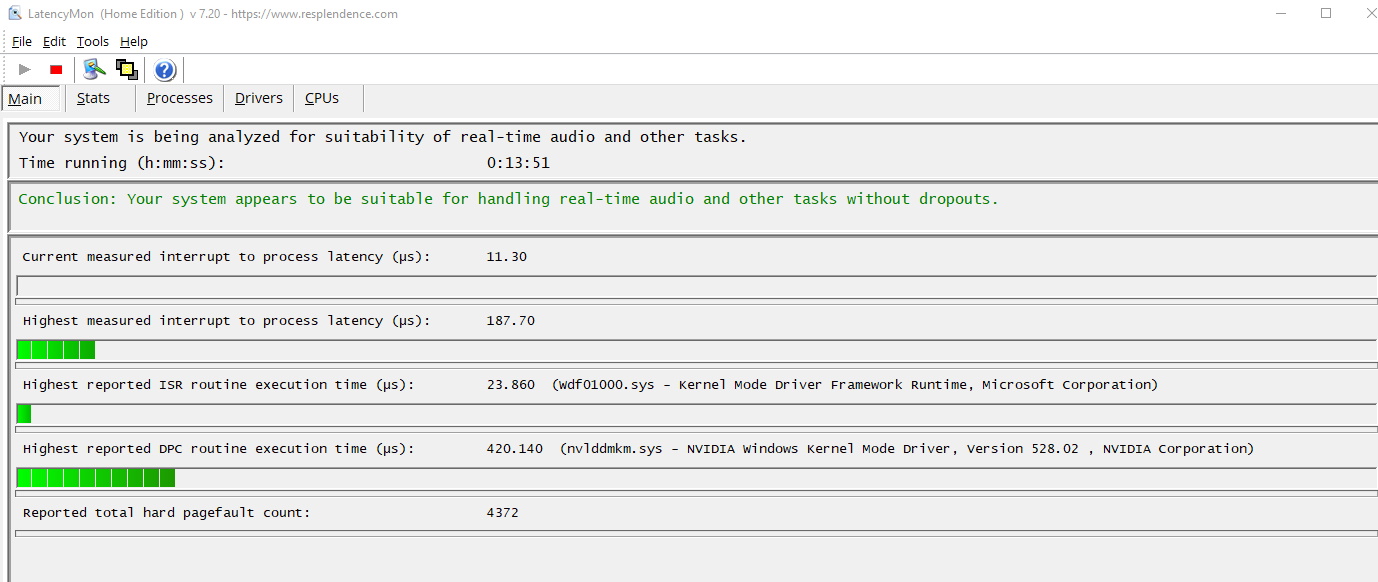
Download LatencyMon, a free utility that will check your system for unusual latency spikes. Reboot to a fresh state and run it for ten minutes. Check the report. Any red graphs? These point to specific subsystems or drivers that are your culprit. If these are not essential, revisit step 8 above and turn these off.
Still problems? The following steps require more technical savvy than those above. I recommend that you seek out more detailed sources of information.
Step 9. Disable Nvidia power saving.
Open the Nvidia Control Panel. Navigate in the tree to "3D Settings" > "Manage 3D Settings". The panel has two tabs. Click on "Program Settings" and wait a moment for the applications to populate.
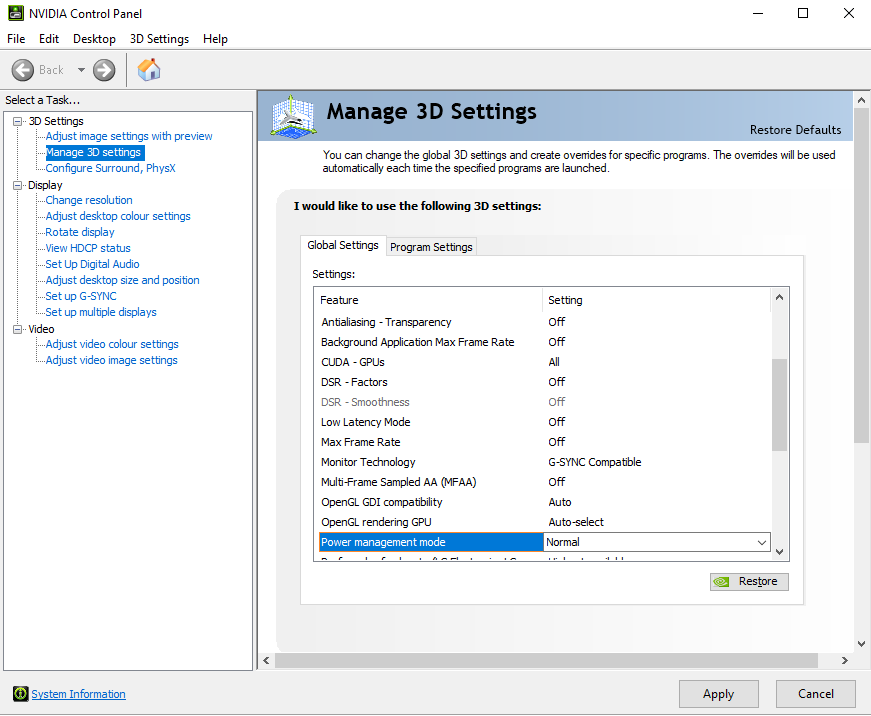
Chances are these application you want won't be present in the list, since this is biased to gaming programs. So, click the "Add" button, choose your DAW, and "Add Selected Program".
Then, change the "Power management mode" setting to "Prefer maximum performance". Your computer will now use more power when idling in that application. But that's a small price to pay for improved audio.
It's been recommended to follow the same procedure for one particular systems application. Click "Add" and "Browse". Navigate to "C:\Windows\System32\dwm.exe" and add the Desktop Window Manager to your list. Then make the same change to power management.
(NB. This step worked five years ago. But for the current driver version, it's no longer possible. Someone should research this issue further.)
Step 10. Change BIOS settings.
The BIOS is your motherboard's firmware. It loads first when you boot up, in order to communicate between your hardware and operating system (Windows). As such, it's fundamental to how your computer functions.
You can enter BIOS settings by pressing the Del key or some function key (e.g. F8) during the boot sequence. Every motherboard BIOS is different, each using terminology that varies between brands, especially between Intel and AMD chipsets.
Your goal is to find the energy/power saving options and turn off unnecessary optimisations. These include C-State, T-State, C1E state, turbo mode, EIST, frequency parking, spread spectrum, or whatever else it might be called on your motherboard. You may wish to try a utility like Park Control to simplify this task.
The result is that your computer will consume slightly more power, but in return will operate with reduced latency. This might prevent glitches caused by your processor switching states. This is referred to as "CPU parking". It's known that Windows manages these factors too aggressively, prioritising power savings over performance and stability. This emphasis comes from the dominance of laptops for daily tasks. But it's an inappropriate approach for an audio workstation.
Conclusion
If this all seems like a lot of work... you are correct! But keep in mind that most people get audio applications working perfectly without even being aware of these issues.
My personal approach to a new computer is to follow the first eight steps and optimise my system for audio before a problem occurs. if later I do get a glitch, it's either a) a one-time aberration, b) the result of some newly installed application, or c) something I've done wrong.
Keep backups of your projects and you can brush off these rare events as minor inconveniences.
Postscript: But what about Apple?
Isn't the previous list of tweaks a great reason to get an Apple computer? Aren't they a lot less buggy?
Not really. Hang around web fora and help groups on social media and you will find people with insurmountable problems on Macs. There will be fewer of them, because fewer people use Apple computers. It's a sample size illusion.
The main problem with the macOS is that it's created with a philosophy antithetical to the use of older hardware and software. Subsystems get deprecated with every version of the OS. Sometimes you can hack old software to work, but other times not. The limited scope of Apple computer hardware does imply that there should be better performance across the board, but this is limited by the company ethos.
A common example: What happens if you need to upgrade to a new version of your DAW (because the macOS no longer runs last year's version) but this new DAW will no longer support plugins you have relied on for years. You now have a choice: either replace perfectly good tools (with the concomitant cost in learning time and cash) or stick with an older OS that is no longer supported and hence has growing security risks.
The situation is even worse with older hardware. The dominant approach seems to be that we should simply throw it out.
With Windows I have been able to run programmes from the nineties and hardware from soon after. That support for diversity means a lot to me.
P.S. This RME forum thread details the Apple compatibility nightmare.
No comments:
Post a Comment